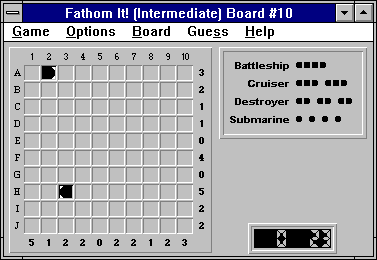
Here is the initial board:

The object of the puzzle is to place all of the ships (displayed in the upper right-hand corner: 1 battleship, 2 cruisers, etc.) on the board so that:
Let's start our solution by noticing the right-segment at (A,2). The only possible ship that could use this right-segment is a destroyer (i.e. a two-segment ship) positioned in (A,1) and (A,2).
Finalizing (A,1) as a left ship segment lets Fathom It! automatically fill in obvious water squares, giving us the following board:

It's clear that the left ship segment at (H,3) can only belong to another destroyer. Finalizing (H,4) as a right ship segment gives us:
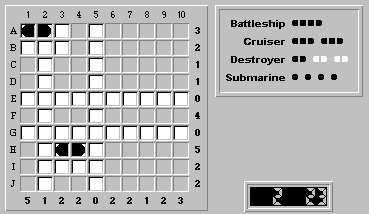
The one battleship in the puzzle can only be positioned within the squares (F,6) to (F,10) -- convince yourself that this is true! Wherever it is placed, the squares (F,7), (F,8) and (F,9) are ship segments. Because the battleship accounts for the entire row tally of four, we also know that the remaining unknown squares in row F, (F,1/3/4), are water. This results in:

Let's concentrate on placing the two cruisers. At first glance, there are four possible positions for a cruiser:
We can immediately rule out (B,10)-(D,10), as this would turn squares (C,1) and (D,1) into water, leaving too few squares in column 1 for ship segments.
The cruiser positions (A,10)-(C,10) and (H,10)-(J,10) are mutually exclusive; although either can hold a cruiser, column 10 can only take three ship segments.
Therefore, a cruiser must reside in the remaining position (H,1)-(J,1):
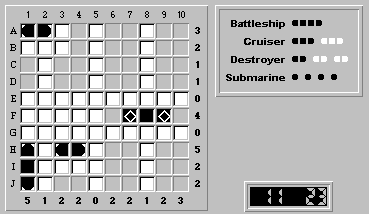
There are only two possible positions for the last cruiser:(A,10)-(C,10) and (H,10)-(J,10). No matter which is correct, square (F,10) will be water. Therefore, the square (F,6) is the left segment of the battleship:

We'll now show that a cruiser cannot be placed in position (H,10)-(J,10). The following figure shows what the board would look like if a cruiser were placed at (H,10)-(J,10):

Because row H is missing one remaining ship segment, a submarine must be placed in either (H,6) or (H,7).
However, because columns 6 and 7 are perfectly symmetrical, the submarine can be placed at either (H,6) or (H,7) without changing the rest of the solution. This would mean that there are two perfectly acceptable, and ambiguous, solutions for this board. Because Fathom It! boards are guaranteed to have a unique solution, a cruiser cannot be placed at (H,10)-(J,10). The remaining cruiser must be at (A,10)-(C,10).
Finalizing a cruiser at (A,10)-(C,10) gives us:

Finalizing the forced ship segments beginning with (D,1), and noting that the remaining destroyer can only be located at (H,6)-(H,7), leads us to the solution:
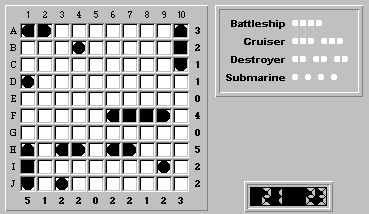
Our logical solution took 21 moves, while the automatic solver would have needed 23 moves to solve it. Congratulations, we beat the solver!
Return to Board Analyses and Solutions